By: Bears Butt

On a trip one summer in Montana or Idaho, my memory isn’t very good, we found ourselves in a little, and I mean small, tourist town sort of out of the way.  It was hot and I wanted a beer.  So into a small restaurant we went to order a beer.  The town had a law that prohibited them from serving alcohol unless with an order of food.  So we looked the menu over.  We were not really hungry, just thirsty.

On the menu was “Fried Dill Pickles”.  We had never heard of such a thing and so we asked the waitress about them.  She assured us we would like them and so we placed the order along with a cold beer and a glass of wine.

The pickles surprised us!  They were a little tangy, crunchy and very good!  Of course I salted mine.

So, how do you make them?

Slice some pickles length wise and set aside.

Mix up some egg with milk or buttermilk, a bit of paprika and maybe some garlic salt.

In a bowl, pour in some corn meal, mixed with flour.

One recipe I found on line said to dredge the pickle slices in the egg mix and then into the flour mix.  Set on a waxed paper and chill in the fridge for 30 minutes or so.  I don’t know how much difference that would make.

Heat up some peanut oil or whatever oil meets your financial means, in a pan suitable for deep frying.

You know the rest of the routine.  Fry until the outside crust is crunchy and brown.

Set aside when done to cool and then serve.  Some folks like to dip them in ranch dressing or some concoction they make up.  Some Dudes Fry Sauce would be good too.

I hope you try these this summer.

Bears Butt

June 12, 2012

Written on June 12th, 2012 , Recipes
By: Bears Butt

This could be the best recipe in the world!  I have not tried it, but from the beginning to the end you are only talking 25 minutes.  Do you like coconut?  Do you like macaroons? I like macaroons.

Here is your recipe site!

http://allrecipes.com/recipe/coconut-macaroons-iii/

And go ahead and make up a double batch and share them with the neighbors.  After all, today is National Macaroon Day!

Bears Butt

May 31, 2012

Written on May 31st, 2012 , Recipes
By: Bears Butt

Today I thought I would let you in on a little secret I learned while on the youth turkey hunt a few weeks ago.  Wapiti and I were assigned to assist the cooks, Chef Dave and One Lisa.  We were pleased to be a part of that team.  I learned a whole lot that weekend and so I wish to share one of my learned lessons with you on this site.

This is a recipe for “Breakfast Burritos”, I had never had a breakfast burrito in my life until that weekend and to be a part of putting them together for the hunters, guides and other guests was a real thrill.

I don’t claim to be the quickest of learners, but there were subtle things happening around the cook shack that I did pick up on and now I will share them with you.  Some of you reading this will say “DUH”!  And that’s ok.  Others will say “I never thought about that!  That is a good idea”!  (so there DUH people)

To begin with, you are the master of this creation.  So get creative.  Just because I chose to use bacon and sausage in mine today, you can use whatever you like.  For instance, bologna, vienna sausages, tuna fish, steak, Limburger cheese…it’s all your choice.

If you choose to use bacon, I strongly suggest you fry (cook) it until it’s crispy.  Otherwise your guest (and you) will be pulling out strings of bacon as you eat it.  First off Emily Post would not approve in her eating etiquette book and secondly, it just is not appealing even to a mountain man to see such a grotesque scene so early in the day.  Ok, cripsy bacon!

So here goes:  You will need eggs, meat, cheese and flour tortilla shells (12 inch) and aluminum foil.  Of course you will need a bowl and a couple of pans to cook in.
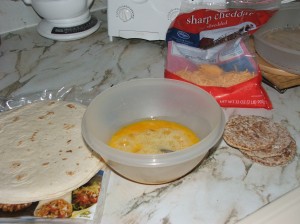
Plop those eggs in the bowl and give them a good whippin!  Make sure all the yolks are broken, on the hunt, Wapiti missed one.
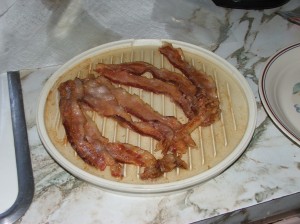
Did I say CRISPY bacon?
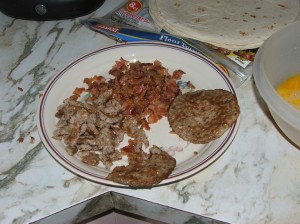
Here I have crumbled up the bacon and am in the process of breaking up the sausage.  The sausage is cooked, but not crispy, just done.  These two meats were my choice for today and they will be put in with the eggs and mixed well.
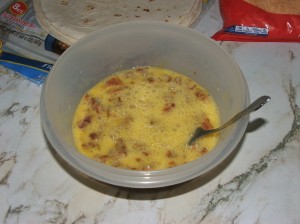
I’m a lazy guy at times and I chose to use pre-shredded sharp cheddar cheese this morning.  You can shred your own or leave the cheese out if you wish.  Here is an idea, slice the cheese and have it ready to put into the wrap at a later time…good idea Bears Butt!
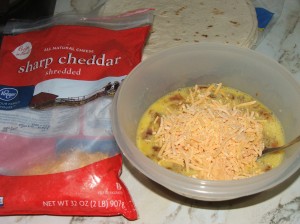
I plopped in cheese until I felt it was enough.  Who measures?  Go with your gut feeling and then mix it all up.  Next it will be poured into a frying pan and scrambled until done.
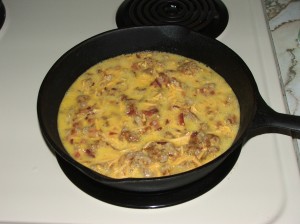
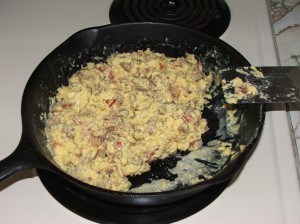
MMMM.  Looks good don’t it?  Depending on how hungry you are at this point you might just grab a fork and start eating.  To heck with the tortilla shells.  But I did not do this and so, we will continue with the recipe.

For my meal today, I needed two wraps for breakfast, but with the upcoming weekend camping trip I needed four more since we will be enjoying two breakfasts while at the rendezvous.  I did mention we were going to the Cache Valley Mountain Man rendezvous this weekend didn’t I?

And so, I pulled out 4 sheets of aluminum foil, each about 15 inches long.  Trivia:  When did “tin foil” change to “aluminum foil”?  Answer:  For a very short period of time in the mid 1950’s tin foil was available to the general public, but most of us were very poor and did not ever use it.  About 1955, Renolds Metals Company started producing sheets of aluminum foil, which was a lot cheaper to make and therefore we could afford to buy it.  A lot of folks today call aluminum foil tin foil out of habit.  Most of us who lived with tin foil will be long gone and folks will have to read something like this to even know it existed.  Let’s get back on track.
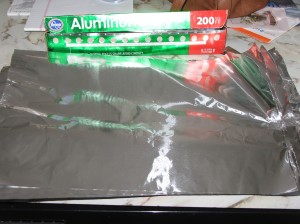
These sheets of  “luminum foil” will be used to wrap up my breakfast burritos so that while camping I can just lay them on the grill and heat them up.  Coffee at that point will mean more than eating and after the coffee I’ll be hungry.

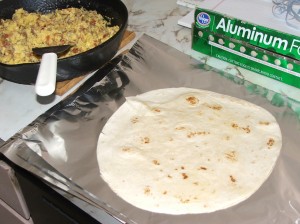
So now it’s time to heat up the tortilla shells.  You do this because when they are hot you can fold and roll them and they won’t break apart.  You aren’t actually cooking them, just heating them.  Flip them over and make sure they are good and hot and pliable.
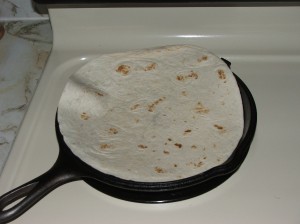
Place the heated tortilla shell on the aluminum foil sheet.
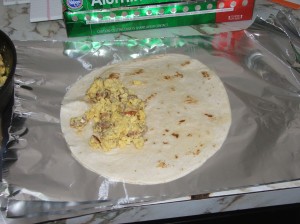
Add a portion of the egg scramble.  Notice how I have put it on the shell toward one edge and made sort of a long line of the egg.  Long line of egg?  Well in relative terms it’s sort of a long line of egg, at least it’s toward one edge.

I might add while being instructed by Chef Dave, he never said to put the egg toward one edge, he just instructed us to put egg on the shell.  Perhaps Chef Dave thought we knew about such things.  He gave us a lot of credit, but we had no clue.
Next is the wrapping of the shell.  One Lisa was there to assist us with the proper way to wrap these bad boys up and she taught us well.  I think she could see in our unguided ways we did not have an inkling of a clue as to what we were doing.  And so, what you are about to see is One Lisa’s method.  It holds a lot of credibility and lends itself well to the eating of this meal.

You start by folding the edge closest to the egg over and around the egg.  Next you fold the bottom of the shell up and over the egg and begin to roll the whole thing up until it’s completely wrapped. (Thank you One Lisa for this lesson).
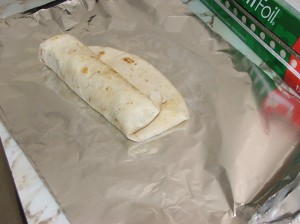
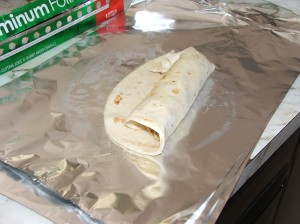
This is the “open end” of the wrap.  And One Lisa went on to say we are going to “guide our guests into eating the open end”.  I did not understand what this meant until we wrapped the whole thing up in aluminum foil.  You will see shortly.
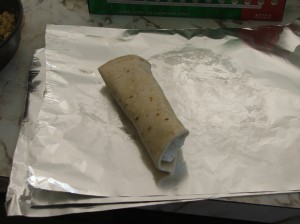
It’s a wrap!

You could pick this up and eat it right now and life would be good.  The folded end keeps the contents all captured up in a nice tortilla roll and off your new shirt or out of your lap.  Pretty cool huh?  (DUH!)

Now let’s save this one for camping.  We will wrap it up in aluminum foil.
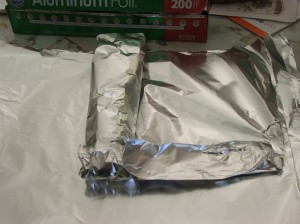
One Lisa said to follow the same guidelines to wrap them in the aluminum foil as we did to wrap the tortilla shell around the egg.  So, fold the close edge over the wrap, roll one time, fold up the edge (same edge as is folded on the wrap) and roll the whole thing up.  Simple!  (for you others DUH!)

And to finish off what One Lisa said, “we are going to guide our guests into eating the open end”…..simply fold over the open end of the foil!  How cleaver!
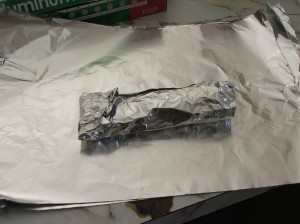
One Lisa, you are amazing!
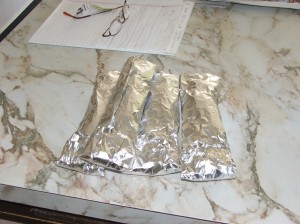
And we continue doing this until all the tortilla shells are wrapped around all the egg.  These four breakfast burritos are going to rendezvous while these other two are going to be todays breakfast.
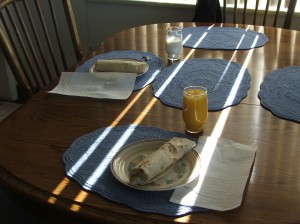
As for how to heat the camping ones up well it’s quite simple (DUH), just place them on the grill and heat them up.  Don’t forget to turn them a couple of times and remember THEY WILL BE HOT!
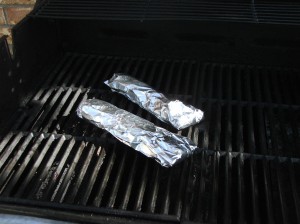
A word of caution….DO NOT PLACE THE ALUMINUM WRAPS IN A MICROWAVE….to heat them.  All heck will occur inside and it will fry the unit up, probably causing a fire, certainly would not be good for the food and your butt would be in very serious trouble.

This recipe is a “Thank you to Chef Dave and One Lisa”!  Both are members of the United Wildlife Cooperative organization, check them out, membership is free and you can join today!  http://www.unitedwildlifecooperative.org

Bears Butt

May 24, 2012


Written on May 24th, 2012 , Recipes
By: Bears Butt

I am planning on using this recipe one of these days and before I lose the magazine I found it in, I thought I would post it up here and then it will be saved forever and ever.

So, what made me think of this?  Yesterday was St. Patricks day and a tradition at my house is Corned Beef and cabbage.

I have thought for many years, “why can’t other meats be ‘corned'”?  Obviously they can by this recipe.

So, even if your name is Lester Mcfink and you live in the deep south, only have access to a .177 cal. pellet gun and the biggest game around your parts are squirrels, you can use this recipe.

I read about this in the January 2012 copy of Fur-Fish-Game, which, by the way is probably THE BEST magazine printed for outdoors type people.  It has something for everyone in every monthly issue printed.  When you have a copy, you just can’t throw it away.  You save them and they stack up neatly.  You can share them with friends (be green and re-cycle).  And even after you have read them several times, you will enjoy them again at a later date.

So, back to the recipe.  It was submitted to the magazine and was printed under the “Letters from the readers” section.  A person named Ron Weiss from Waynesburg, Pennsylvania submitted it.  I give a hearty THANK YOU to Ron Weiss for this.

So Ron suggests you use a chunk of meat in the 2 to 3 pound range.  No bone and sliced less than 2 inches thick.  A good choice since most of my wild game meat is cut less than that anyway.  And if you are going to Corn up some squirrel, they aren’t more than 2 inches thick in the first place.

Ron says not to worry about the sinew because the brining and cooking will melt it away.

Ok, so my take on all of this is this:  Why does the meat have to be in one big chunk?  Why not take some smaller pieces and put them all together to get the 2-3 pounds?  Maybe it will be too salty, I don’t know.  If you try it and it is too salty, let me know on here by leaving a comment.  I’m sure other readers of this will want to know as well.

So, here is Ron’s recipe:

In a boiling pan pour in 2 quarts of water.  Add in 1/2 cup of canning salt (I don’t know what that is, but will find out.  1/9/2014 I found out that canning/pickling salt is salt with nothing else added and it was suggested that Kosher salt is a good salt for canning!  There you have it).  Then 1/2 cup of Morton’s Tender Quick (it is a salt that is very finely ground and it contains nitrites that kill bacteria).  2 tablespoons of sugar (I think brown sugar would work as well, just sayin).  2 tablespoons of pickling spice.  4 bay leaves (I think I will leave this out when I try it, maybe not).  8 whole black peppercorns and a fresh garlic clove all crushed up.

Bring all of this to a boil.

Let it cool.  Put your meat in a plastic bag, glass or ceramic container (NOT A METAL container) and pour the cooled mixture over the meat.

Now put it in a cool place, like your refrigerator for 5 days.  Ron says to turn it over a couple of times during those 5 days.  I would turn it over at least once each day.  Heck, you are probably going to go and get a beer anyway at least once during the day, why not turn it over then?

So, after the 5th day it is pickled real good.  Pour the mix off the meat and if you don’t like your meat really salty, Ron suggests you rinse the meat off.

Now here is where Ron and I differ.  He says to use a pressure cooker to cook the meat with 1 and 1/2 cups of water.  He says 45 minutes at 10 pounds pressure.  I say, just put the water in a pot and boil the meat up until it is tender to you.  Fork tender!  We all know what that is.

When the meat is all done up good.  Put it in another dish and place it in the oven to keep warm.  Use the broth in the pan to cook up some spuds, carrots, cabbage or whatever meets your fancy for the rest of the meal.

Ron, Thanks again!

Now, once the meal is all cooked, don’t throw the broth away.  Put it in freezer bags in amounts that will just fill a Thermos bottle and freeze it for later.  I have found that a hot Thermos bottle of the broth is WONDERFUL when you are out on a cold day hunting or ice fishing.  Nobody I have ever gone hunting or fishing have turned it down.

So, there you have it.  It seems to me the hardest part is the 5 day wait.

Bears Butt

March 18, 2012

P.S. Lester, if you are out there and try this on some squirrel please let us all know how it turned out.  Thanks!

UPDATE

April 19, 2012

I took 3 pounds of various packages of venison out of my freezer and mixed up the brine..soaked 5 days etc.  Then I split the meat up into 3 different packages and re-froze two of them.

I boiled up the first package and we ate it just like corned beef bought from the store.  This meat was better than the store bought.  Very good in every way.  It actually tasted much like beef.

A few weeks later, I pulled out one of the frozen packages and thawed it.  My thought was to cook it on the grill and see how well that went.  It did not go well.  I cooked it as if it was a normal steak and when we sat down to eat it was tougher than a jackrabbits hind leg, just below the knee.

The next day I baked it in the oven and it got really nice and tender, but when we sat down to eat, it was so salty it made your tongue hurt!  Nasty!  And so as not to throw it out, I told Sherry I would boil it the next day and see if the salty taste would cook out.  And it did!  And we ate well on the evening of the third night.

So, it looks like meat brined in this way will have to be boiled in order for it to be edible.

Lester?  Boil up those brined squirrels and give us an update on here.

Bears Butt

Written on March 18th, 2012 , Recipes
By: Bears Butt

This is probably the easiest recipe in the world to put together and it is a favorite one of mine when I just don’t feel quite up to par.  This one can be made in a hurry, wolfed down and allow you to get back into bed for a couple more hours of needed sleep.

Poached Eggs

Pour 1/2 cup of milk in a small pan and begin to heat it.

Break two eggs into the milk.  Be careful not to break the yolks.

When the milk gets close to boiling turn off the heat and cover the pan.

After about 5 minutes in the hot milk, the egg whites should be cooked through.

Toast up a slice or two of bread.  Butter it and put it flat down in a large eating type bowl, or on a plate with a lip.

Pour the milk over the toast and place the eggs, yolk side up on the toast.

Salt and pepper to taste.  Enjoy!

Bears Butt

Feb. 2012

Written on February 9th, 2012 , Recipes
By: Bears Butt

Ham and beans has to be about the simplest recipe on earth and the end result is a most delicious meal!  MMMMMMM

Borrow some baby lima beans, black eyed peas, pinto beans, big lima beans, red beans or Anasazi beans from your neighbor.  Or go buy some.  Sort through the bag and take out all the rocks and bad stuff you sometimes find in with the beans.  Put them in a big bowl and cover them with water to soak over night.  Set them aside until tomorrow.

Tomorrow:

Get hold of some ham.  Ham with bone is good.  Ham with ham is good.  You have to have a lot of meat for this to be extra good.  But, if times are tough and you can only get a little ham, so be it, it will still be yummy.  Ham fat is good too if that is all you can get and most folks don’t like ham fat…I do like it.

So, now you have some ham.  Get a couple of yellow onions.  Sometimes you can find them along side the road.  They are the best, cuz they are free.  Even if you have to buy them you are only into the cost about a buck.

Cut up the ham into pieces about half the size of the inside of a eating spoon.  Cuz that is what you will be eating this stuff with later on.  Bigger pieces are too much for the spoon to gather up.  Toss the chunks into a large pot.

Dice up the two onions, spoon size pieces as well and toss them into the pot on top of the ham.

Now pour water in on top of all of that maybe even to the mid level of the pot.

Boil it up!  Then lower the temp and let it still boil but slowly.  Let it cook for a couple of hours with a lid on the pot.  Don’t it smell yummy?

For us old folks with problems caused by salt, you don’t have to put any salt in this if you don’t want to.  Just add in some black pepper to your taste.

OK, now you have the ham and onions all cooked up good.  If you have tossed in a ham bone, git it out and strip all the meat off of it.  Let the bone cool and give it to your dog.  But whatever you do with the bone, don’t put it back into the pot.  If you have used ham hocks, you will have several bones to get out, fish around until you think they are all out.  If you leave one, there will be one of your special guests that will get it in their mouth and even though they won’t say anything to you, they will think “What a dummy.  They don’t even know how to cook”.

Now dump off the water from the beans and put them in the pot with the ham and onions.  Make sure the water level is above the beans and commence to boil it some more.  Depending on the beans you got, it might take anywhere from an hour to maybe even three hours to cook the beans until they are tender and there is a soupy goo in the pot.  MMMMMM  Let this cook down some with the lid off and you will have the best ham and bean soup you ever tasted.

Let your guests (and you) doctor it up with ketchup, salt, pepper, hot sauce or whatever they want.  You can serve it plain in a bowl or put it over some home made corn bread or plain bread.  Saltine crackers are good with it poured over too.  Maybe even cold pizza would be good with it poured over.  I’ll bet it would be.

Bears Butt

Jan. 2012


Written on January 16th, 2012 , Recipes
By: Bears Butt


I found a really good recipe for fortune cookies on line at “About.com:Chinese Food” .  It is an easy recipe to follow and makes really good tasting fortune cookies.

Why would a mountain man want to make fortune cookies?  I’m glad you asked.  Because I (and my group of hunting buddies) like to cut up and this is a good way to put in fortunes that are pertinent to the hunt we are on.  Especially special hunts like we have coming up this week.  Dry Dogs Dream Hunt.

So, when you know the characters that are going to be at the hunt, you can tailor the fortunes to those folks and hope they draw out the cookie that most applies to them.  But if they don’t that is ok too.  The main thing is to have fun and doing different things on each hunt makes that hunt stand out from all the others.

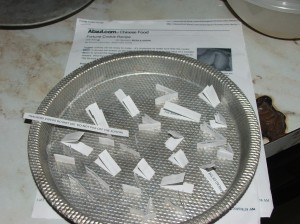
So, let’s say you too are going on a dream deer hunt and a bunch of buddies are going along for the ride and to help you out.  You are going to want to have at least one fortune cookie for each one of them and inside the cookie will be some special note.  You have to make up the notes ahead of doing the cookie recipe, cuz the note has to be put inside the cookie.  So let’s make us some notes.

One of mine says:  Quote of the year 2010, “Now that’s what I’m talkin about right there!”—Hunter

He made that quote as he was looking at an extremely large mule deer buck that was being shown to us at our camp from a very happy hunter.

One of my favorite sayings and I say it a lot during the hunts,

Don’t shoot at the antlers.


So, you make up yours accordingly.

Ok, so here is the recipe and how I have changed it up some.  On line, this recipe says it will do about 10 cookies, I’m here to tell you it will make a whole lot more than that if you follow my lead on this.

Recipe:  2 Large egg whites, ½ teaspoon vanilla extract (they say “pure” vanilla extract…what’s that?), ½ teaspoon almond extract (I’m going to try some of this stuff when I trap muskrats next spring, it smells like it would attract them), 3 tablespoons vegetable oil (I used olive oil), 8 tablespoons all purpose flour, 1 ½ teaspoons cornstarch, 1/4 teaspoon salt, 8 tablespoons granulated sugar and lastly 3 teaspoons water.

Grab up two bowls to mix in.

In one put the egg whites, vanilla, almond and oil…using a fork, beat the pee-jeasus out of it until it froths but doesn’t go beyond that point, you are not making meringue.

Now in the other bowl sift together the dry ingredients: flour, cornstarch, salt and sugar, when you are satisfied they are all mixed pretty consistently, add the water and stir that around some.  Now, dump all of this into the egg bowl of stuff.  Mix this up until it is smooth as silk and no lumps are seen.

OK, so the recipe I found on line says to use a cookie sheet and put a full tablespoon of the mix in spaces apart from each other and twirl the pan around until the piles of mix spread out and are about 4 inches across blah, blah, blah.  I guess if you were in a hurry or had some help you could do this, but take it from me, if you are working alone you won’t have time to deal with more than two at a time.  Here is what I do.

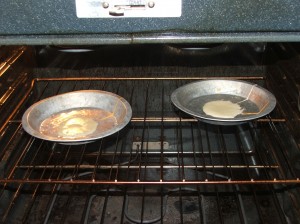
I got two pie pans out, with smooth bottoms, not the bumpy bottom ones.  Then I dip out some mix with a tablespoon and I spread around a thin layer of the mix until it’s about 4 inches across.  It’s really thin and you will see why in a minute.  Once you have that spread out in the pan, put it in the preheated oven of 300 degrees.  I forgot to tell you that earlier.  300 degrees.

This next part was hard for me to understand at first, but it makes sense now.  These babies are going to take upwards of 15 minutes to brown up.  In my neck of the woods, at 4200 ft. above sea level it takes 11 minutes.

I hope you have your messages all folded up and ready to be put into the cookies, cuz if you don’t you just have 11 minutes to get two of them ready.  Fold them up pretty small.  Now, get out a small spatchula and an empty cup with thin walls.  Get a hotpad out too.  When the timer goes off and you can see the cookie has brown around the edge maybe even ½ in into the cookie they are done.

Work really fast now!  Spatchula up that cookie and flip it over onto the hotpad.  Grab up a fortune note and place it off center on the cookie.  Fold the cookie over the note and then pick the hot little devil up and push the folded edge down over the edge of the cup.  Hot ain’t it ?  Set it down, but keep track of the edges so they don’t come apart.  The burning pain will be gone soon as it cools!  I hope your buddies are worth all of this pain and trouble.

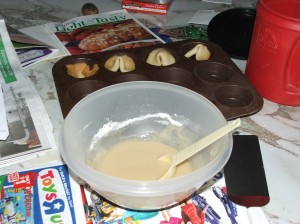
A trick to be noted here, if you have a muffin pan handy, instead of bearing the burning pain, you can put the folded cookie inside one of the pan spaces and it will hold its shape and you won’t get burned so much.

Can you see why putting a bunch of the mix on a cookie sheet just would not allow you enough time to process all of those hot little guys fast enough before they cooled to the point you could not bend them?

Well you should have yourself two fortune cookies made by now.  Sort of fun huh?  And the very best part is you made them and they have personal fortunes in them.

By doing it my way and making thinner cookies you will get about 26 cookies out of this mix.

Some other stuff you might want to know.  You can color the mix by adding food coloring at the stage where you mixed it to smooth as silk.  Green, red, blue, yellow, black…whatever!  How about making black ones for someones wedding?  Blue ones for the boy baby shower or pink for the girl baby shower?

Bears Butt

Nov. 2011

Written on November 21st, 2011 , Recipes
By: Bears Butt

Pour on the duck fat, in moderation

Nutrition Lab

Foodies say it’s high in beneficial unsaturated fats and closer in composition to olive oil than butter. Though that’s true, experts say the health claims are overstated.

March 27, 2011|By Elena Conis, Special to the Los Angeles Times

Love fries but hate the thought of artery-clogging fried food?

A growing number of gourmet restaurants and foodies see a solution to this conundrum in an unlikely source — duck fat. They consider it a healthy alternative to frying foods in pork fat, beef fat or even butter. Duck fat is high in beneficial unsaturated fats, and its chemical composition is closer to olive oil than to butter, they say.

Plus, it’s delicious. “I love it,” said David Bazirgan, executive chef at the Fifth Floor restaurant in San Francisco. “It has a deep, rich flavor that coats the palate.”

But some experts say health claims about the fat are overstated. Though duck fat is among the healthiest of animal fats, it’s still a significant source of saturated fats, said Dr. Freny Mody, director of cardiology for the Greater Los Angeles Veterans Affairs Healthcare System.

“It may be a peg closer to olive oil, but it’s still miles away,” Mody said.

Duck fat’s popularity has surged in part because consumers are seeking all-natural, locally sourced alternatives to commercially produced items, said Melissa Abbott, culinary insights director with the Hartman Group, a Seattle-area market research firm. Compared with, say, margarine, duck fat has a single, minimally processed ingredient: fat taken from ducks. It’s available from local butchers and at farmers markets, though a few national retailers sell it as well.

Abbott said the fat had also gained some cachet thanks to the so-called French paradox — the observation that the French are thinner and have a lower incidence of cardiovascular disease than Americans despite enjoying a diet loaded in fat. The paradox has stumped researchers for decades, though some theories chalk it up to a number of characteristics of the French diet — including small portions, lots of red wine, and, of course, the consumption of duck fat.

While traditional French recipes can call for copious amounts of the fat (duck confit, for instance, involves cooking duck legs immersed in duck fat for 10 hours), the current vogue in the U.S. is to use it in more sparing amounts to make fries, to roast potatoes or to saute vegetables. Chefs treasure its dense, savory flavor and its resistance to breaking down at high temperatures. They also like that it’s a healthful fat, Abbott said.

That belief is based on its composition of saturated and unsaturated fats. According to the National Nutrient Database maintained by the U.S. Department of Agriculture, duck fat contains 62% unsaturated fat and 33% saturated fat.

Saturated fats raise blood cholesterol and increase the risk of heart disease, said Dr. Karol Watson, co-director of the UCLA Cholesterol and Lipid Management Center. At 33%, duck fat’s saturated fat content isn’t terribly low, she points out. In fact, it’s on par with chicken fat (about 30% saturated fat) and pork fat (39% saturated fat). All three are better than butter, which is about 51% saturated fat.

Proponents of duck fat prefer to highlight its unsaturated fat content. Studies have linked unsaturated fats — including both monounsaturated and polyunsaturated fats — to lower blood cholesterol levels. Dutch researchers who reviewed 60 studies of the effects of dietary fat intake found that replacing saturated fats with unsaturated fats reduced levels of bad cholesterol and raised levels of good cholesterol, which in turn decreased the incidence of coronary artery disease by 18% to 44%. Their findings were published in the American Journal of Clinical Nutrition in 2003.

Written on November 15th, 2011 , Recipes
By: Bears Butt

Well I took the ducks Edjukateer and I bagged yesterday and ground them up to make jerky.  I used my ever so tried and true venison/elk jerky recipe and the only thing different is the meat…ground duck.

I can tell you the texture of ground duck is a lot like that of sheetrock mud.  If you have ever played with that stuff before.

I mixed it all up yesterday afternoon and it had to sit for about 24 hours for the salt to work on the bugs in the meat.  So now it’s in the dryer.  Hope it’s good!

Bears Butt

Nov. 2011

THE NEXT DAY!

So, the jerky stayed in the dryer for about 7 hours before I shut it off and we went to bed.  I was a bit reluctant this morning to try it, as after I got the drier going yesterday I queried the wed about ground duck jerky and every site on the search said “DON’T DO IT!!!  IT TASTES LIKE YUK!” or some such negative comments.  All of them were praising the sliced meat, marinaded and then dried versions.  So…I pinched off a small bite and tossed it into my mouth.

Munch, munch, munch…soft….pliable…..not too salty….a bit on the bland side….Not too bad!  I finished the small piece I had broken off and now can honestly say….THIS STUFF IS GREAT!!!!!

What I will do to the recipe in the future, and there will be a future, is to add more black pepper, like maybe three times what the recipe calls for.

The jerky does NOT taste like duck.  It honestly tastes like it was made from beef or venison or elk or something other than duck.  I’ll bet goose would be just as good.

So, there you have it.  Look up my jerky recipe on this site, modify the amount of pepper you add, keep everything else the same and you too will be enjoying some very, very good jerky.  Make sure you dry it at a temp of 160 degrees.  The book says anything less will not be good, nor good for you.  If you use an oven, put a thermometer in there while it’s drying and make sure it stays at 160 and also prop the door open to let out the moisture.

Enjoy!

Bears Butt

Nov. 2011

Written on November 9th, 2011 , Recipes
By: Bears Butt

Last nights supper was a very simple one.  Sherry wanted a meat and veggie type dish, no rice, no potatoes, no starchy anything.  So, what does my little mind come up with “Swiss Steak”.  Usually served with rice, but not this time.

Out comes a package of venison “chunks”, and once thawed yielded six pieces of meat each about three inches long and 3/4 inch wide.  Not much meat, but it would have to do.

I put a tablespoon of olive oil in the pan and browned the meat.  Then put the meat in a smallish dish that could go in  the oven.

Next I took a handful of those little carrots and chopped them up.  It turned out I chopped just enough to cover the bottom of the 10 inch pan I used to brown the meat.  I chopped up one stick of celery and diced up three small fresh tomatoes.  All of this went into the pan with the carrots.  Then I added about one tablespoon of beef bullion and a “dash” of water from the faucet.

I heated this all up and stirred it the whole time.  It boiled for maybe four minutes while I stirred it.  Then into the dish on top of the meat it all went!

Covered the dish and baked it in the oven on 350 for about an hour.  Probably an overkill on the baking time, because the meat was fork tender and the whole thing was WAY YUMMY!  It was amazing to me that it did not need any seasoning other than what the bullion gave it.

We will be doing that one again!

Bears Butt

Oct. 2011

Written on October 18th, 2011 , Recipes

BearsButt.com | Stories, Ramblings & Random Stuff From an Old Mountain Man is proudly powered by WordPress and the Theme Adventure by Eric Schwarz
Entries (RSS) and Comments (RSS).

BearsButt.com | Stories, Ramblings & Random Stuff From an Old Mountain Man

Just some of my old stories, new stories, and in general what is going on in my life.