Today I gave it a go to winterize my 1992 Fleetwood Flair Motor Home. Earlier in the week I spent part of a day trying to locate the hot water tank by-pass valves and I found one! I was elated! I knew it had to have one and sure enough I found it.
So, with 3 gallons of RV Antifreeze in my hands I attacked the job! I knew it would not take all 3 gallons, but since I was walking all of the 50 feet to the coach I decided to take them.
In the past I would winterize by buying 8 gallons of rv anti freeze and filling the hot water tank with 6 of those gallons, finish off the winterizing and then draining the hot water tank rv anti freeze back into the bottles. Yes, it would be diluted some, but it still would not freeze. Each year I would buy 2 more gallons and so forth.
This year I was bound and determined to find the hot water tank by pass system and only need two gallons to do the job.
I was also going to make sure I made notes as to how I accomplished the task in case someone else in the future needs to do it. I did not have any instructions when I bought the coach. I guess the other owners must have either lived where it was not necessary to winterize or they hired it done.
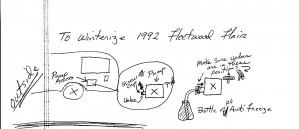
So, to the outside rear of the coach I went. Opened up the access door to the water pump and pulled my handy dandy homemade connector and hose from its hiding place. Unscrewed the cap on the side of the water pump and installed the connector with the hose to it. Turned the valve above the connection to point at the hose and stuck the other end of the hose into a bottle of rv anti freeze. Oh, I got the step stool out from inside the coach to set the bottle of rv anti freeze on.
Inside the area close to the water pump are two valves. One I have to turn in order to fill the fresh water holding tank and when done, I turn it the other way to drain the tank. The other is positioned closer to the water pump and I have no real idea what it is supposed to do.
Today, I decided that the “unknown” valve must be to help facilitate winterizing and so I turned it across from what it was. And then into the coach I went. I was filled with joy knowing I was going to only use about 2 gallons of rv anti freeze and by pass the hot water tank. Happy Guy was I!
Into the coach and under the drawers used to hold knives and folks and things I pulled out a box of whatever we were storing there and turned the valve! Life is good.
I have an old milk jug I have cut a hole in the side of that allows me to place it over the tap faucet to keep water and stuff from splashing all over the inside of the coach. I placed it over the kitchen sink faucet and turned on the cold water tap. Then reached over and hit the pump switch. I could hear it hissing and I waited patiently for the pink fluid to push out the water from the line. It hissed.
It hissed some more but nothing was coming out. I scratched my head and then turned off the pump and went outside to see what was going on. The one gallon jug was empty and fluid was pouring onto the ground! YIKES! That valve I turned caused the fluid to pour straight out of the pump and onto the ground! Why on earth do they have that valve in the first place?
I reached in and turned it back the way it was, which happened to be lengthwise to the coach. I felt a tag on the valve and picked it up, it was in my own hand writing and it said “To send water forward into the coach”! Oh my, I just wasted a gallon of rv anti freeze.
Well with two gallons still remaining I knew I could still get the job done. Here is the configuration of the valves at the pump area.

Water Pump valve points toward hose, first valve points toward the front and back of the coach, second valve points across the coach.
I put a second gallon of rv anti freeze on the step and put the long plastic hose into it.
Back inside I went. Ok, now it should pump rv anti freeze for me. I hit the pump and sure enough water began coming out of the cold water tap at the kitchen, pretty soon it was solid pink and I shut off the pump and the cold water tap. Back into the bathroom I went with the old milk jug. Put it over the bathroom sink and turned on the cold water tap. Reached into the hall and turned on the pump. Water soon turned to pink and that was done. Off went the pump and off went the cold water tap. Next the shower head, same drill and then the toilet and hand wand. All spewing solid pink fluid.
Now for the hot water lines. Back to the kitchen, on went the old milk jug and on went the tap, on went the pump…nothing. HMMM. Must be out of juice at the pump. Off went the pump and outside I went. Sure enough the jug was almost empty. I put the third jug on the stool and put in the tube. Back inside I went. On went the pump, it burped and then stopped. HMMMM. I turned on the cold water tap, the pump began going and out came pink. Off went the cold water tap, the pump stopped immediately.
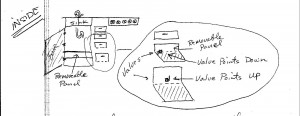
I figured there must be another valve somewhere to the hot water tank. I turned off the pump and started to search for a second valve to the hot water tank. Pulling everything out from under the sink and the two drawers that hold knives and forks etc. I followed the hot water line as far as I could see it. Nothing. Now what? I started reaching in behind the paneling and suddenly I could feel another valve. This valve is located above the “easy” one to find.
I say to myself, this is a valve I need to turn, but how on earth do I get to it? Soon I discovered the small panel under the sink was only held in place with velcro. I removed the panel. Access to the hot water temperature adjustment! But not to the valve, unless I reach across, which is doable, but the valve is on the other side of the pipe. I think again to myself, well, if this panel is removable, I wonder if the one in the little spice drawer is removable. I pry at the top with my stubby fingers and pop! Off it comes!
From this “opening” I can see the top of the valve that needs to be closed. It has not been moved in a very long time and took me a bit with my handy dandy Gerber to get it to move and close. Now things are really looking up.
Back to the pump, it’s on and water begins to pour out of the kitchen hot water tap almost immediately. Soon it’s pink and off goes the pump and into the bathroom I go. Bathroom sink done. Shower head is last, sphushhhhhh, sphushhhhhh…..no fluid! Off goes the pump. Back outside I go.
Sure enough gallon number 3 is empty. Dang, so close!
So, into the garage I go to see if by chance there is more rv anti freeze! YES! Behind the jug of windshield washer fluid is a half filled jug of rv anti freeze. I’m a Happy Boy! I’m a Happy Boy (sounds like a song doesn’t it?) and I was a happy boy indeed. Now I can get the job done!
And so it went, I finished the job and that will be it until next Spring.
Here is the valve locations on the inside of the coach:
When I was done, I opened up both of the valves to the hot water tank and some fluid sprayed into the tank. No big deal as it drained right out the outside drain hole.
So here is the whole story in a nutshell:
Set everything up before turning on the pump. Start pump and turn on one faucet at a time until pink fluid comes out. Flush toilet and turn on hand wand until pink comes out. Make sure drains in sinks and shower get pink fluid into them. two gallons will do the job, if you follow these steps! Trust the Butt!
Additional Information: The Low Point Drain valves for this 1992 Fleetwood Flair Motor Home are located behind the panel in the door opening under the fridge. You have to lay down and work with one hand to unscrew the panel, but you can do it!
Bears Butt
Sept. 12, 2012


 Utah Fishing Reports
Leave a Reply